
An API token lets another system call your deployed app without a browser. The token acts as a Tray API user that has access to the app, so a request carrying it runs with everything that user can do, with no sign-in page, cookie, or redirect involved. Create tokens from the project’s Access Control tab in the dashboard, and send one as a bearer token on requests to the app’s URL.
When you need one
Every deployed app is behind login. A person who opens it signs in and gets a browser session that lasts eight hours. That works for people and does not work for a cron job, a webhook sender, a script, or another app, none of which can sign in. An API token is the credential for those callers: it is long-lived, it is tied to a named API user rather than to a person, and you can delete it on its own without touching anyone’s account.
Before you start
An API token always acts as an API user, so the project’s workspace needs at least one before you can create a token. API users are created in Tray, not in Helix: go to Account Settings, then Tokens, then Create API user, and pick the workspace the project belongs to. Tray’s API users and tokens page walks through the form and the roles involved. You only need the API user from that flow; the Helix token is created in the next section.
Creating and deleting Helix API tokens needs the same permission as creating API user tokens in Tray. Organization admins have it. Workspace admins have it when an organization admin has allowed workspace-level token creation. Anyone who can open the project can see the list of tokens, but the Create token button and the delete action are disabled without that permission.
Create a token
- Open the project in the dashboard and go to its Access Control tab.
- Choose API tokens. The tab lists the project’s existing tokens, with the API user each one acts as, when it expires, and when it was created.
- Choose Create token.
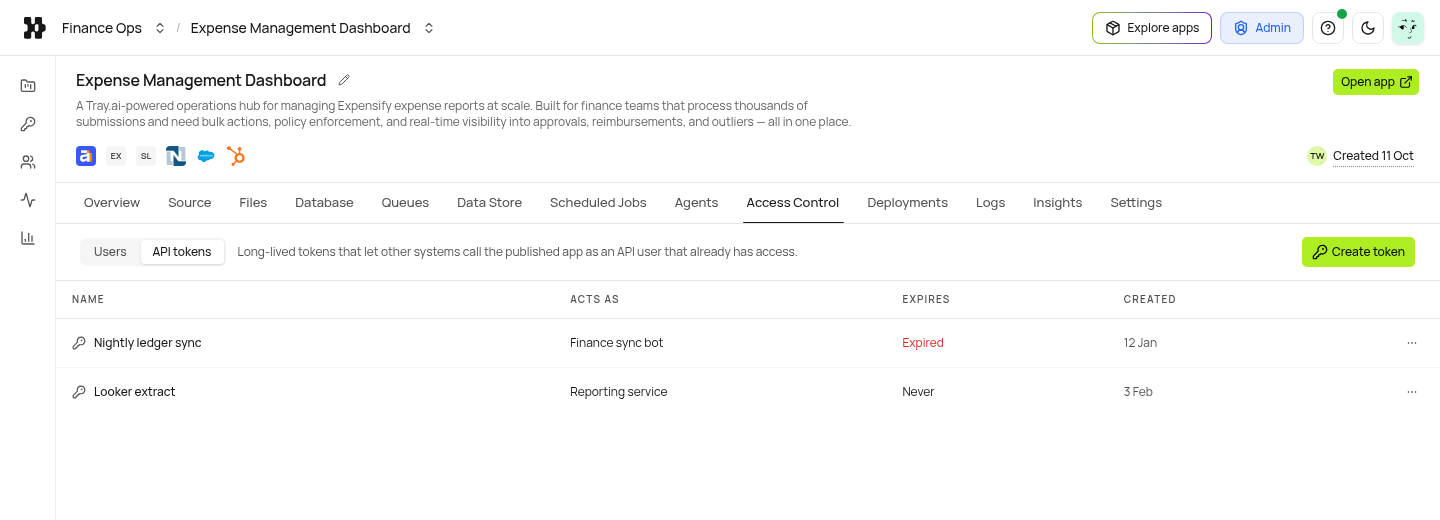
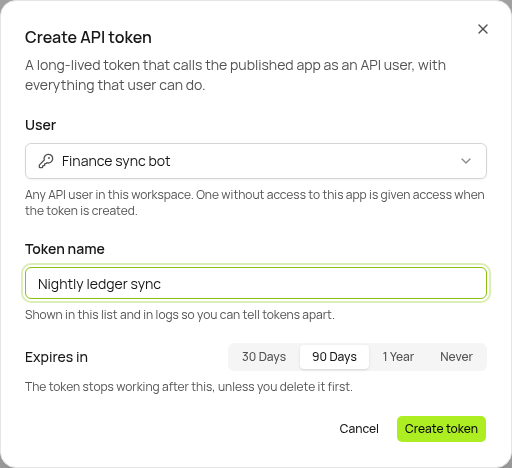
- Pick the User the token should act as. The list shows every API user in the project’s workspace. An API user that does not yet have access to the app is marked “no access yet”, and creating the token also grants them access, the same as inviting them on the Users tab.
- Give the token a name of up to 60 characters. The name is how you tell tokens apart in the list later, so say what calls with it: “Nightly ledger sync” rather than “token 2”.
- Pick when it expires: 30 days, 90 days (the default), one year, or never. A token with an expiry stops working at that point unless you delete it first. A token set to never works until you delete it.
- Choose Create token.
The dialog then shows the token once. Copy it before you choose Done: it is not stored anywhere you can read it back from, and there is no way to see it again. If you lose it, delete the token and create a new one.
Call the app with it
Send the token in the Authorization header as a bearer token on requests to the app’s URL. Either of the project’s addresses works: the project ID URL, or the readable alias URL if the project has one. For anything automated, use the project ID URL, since it never changes. See project URLs.
curl https://{project-id}.helix-app.ai/api/v1/invoices \
  -H "Authorization: Bearer hxk_..."
The request runs the function for that route as the API user. There is nothing to change in your code: the same function handles a request from a signed-in person and a request carrying a token. Inside the function, ctx.identity.user.id is the API user’s ID, so an app that branches on who is calling sees the API user, not whoever created the token. See the ctx.identity reference.
A token is only accepted at the app’s own URL. It does not sign in to the dashboard, and it is not a CLI credential.
What a token can and cannot do
| Property | Detail |
|---|---|
| Acts as | The API user you picked, with that user’s access to the app |
| Reaches | Every route in the deployed app, the same as that user in a browser |
| Survives | New deployments, and changes to the project’s connected services. The token names an identity, not a version of the app |
| Stops working when | It expires, you delete it, the API user loses access to the app, the API user is deleted in Tray, or the project is deleted |
Because the token acts as its API user, access is governed by the same Access Control settings as everyone else. If the project’s setting is Workspace or Organization, every API user in scope can be given a token. If it is Only people invited, the API user has to be on the list, which the create dialog handles for you. Removing the API user on the Users tab stops every token that acts as them.
Delete a token
Open the token’s menu in the API tokens list and choose Delete token. The next request carrying that token is rejected. Deletion cannot be undone, so if a caller still needs access, create a new token first and switch the caller over before deleting the old one.
Expired tokens stop working on their own and drop out of the list.
Limits and audit
A project can hold up to 50 live tokens at once. Beyond that, creating another fails until one is deleted or expires. See limits and defaults.
Creating and deleting a token are both recorded in the organization’s activity trail with the actor, the token’s name, and the API user it acts as. The token value itself is never recorded anywhere.
Who can do what
| Action | Who |
|---|---|
| See the project’s tokens | Anyone who can open the project |
| Create or delete a token | Organization admins, and workspace admins when an organization admin has allowed it |
| Create the API user a token acts as | Organization admins in Tray, or workspace admins when allowed; see the Tray page |
If the Create token button is disabled for you, ask an organization admin to create the token, or to allow workspace admins to.